


I was shopping around for a new laptop suitable for software development (Docker, VS Code, C#, node.js, local MySQL and other dbs, etc) and I narrowed it down to X1 Carbon and MacBook Pro 15″. I needed something beefy to run Docker, as well as something light as I carry the laptop to work. Display, battery life, and design are my top considerations.
MacBook hit all the notes – great display with good PPI and aspect ratio, light, good battery life, and great design. Only thing that made me hesitate is the negative reviews on the internet criticizing the butterfly keyboard found on the new MacBooks. My previous MacBook Pro 17″ (from 2010) is still kicking strong, and I never had an issue with its keyboard.
On my workstations at home I use Das Keyboard with Cherry MX Brown. I also have IBM Model M keyboard. So I’m used to higher actuation force.
I was pleasantly surprised at how well the butterfly keyboard feels. It’s similar to a mechanical keyboard — it’s clicky and the key engages without having to travel far. My old MacBook’s keyboard now feels mushy (so does the keyboard on the X1 Carbon).
If you are shopping for a laptop and prefer mechanical keyboards – you can ignore the negative reviews of the MacBook’s keyboards. As far as “sticky key” problem is concerned – if it ever happens I’ll send the laptop to Apple for a fix. It does not worry me. Just remember to keep to keyboard clean.
Let’s say it’s 2pm on a weekday. Not a busy time for restaurants or lesser known fast food joints. The restaurant must be staffed nonetheless — cooks, waiters, etc. have to be paid and there are other running costs as well.
At around that time, I open Google Maps and type in “food”. The maps app renders me a list of food joints in the area. Wouldn’t it be cool if in real time Google shows a little tag next to a restaurant name, displaying a discount (that may be valid for the next 30 mins, etc.).
The discount can be manually set by the restaurant owner via some sort of Admin interface. The user can enter days, times of day, etc. and the discount amount. Or you can enter a “flash sale”. The owner would have to know how much she is willing to discount and on what date/time based on restaurant’s sales data.
Alternatively, the discount could be auto calculated based on analyzing the sales data in real-time. AI and analytics engine can look at historic records as well as sales targets for the month to see if any discounts should be given. If it makes sense to discount and get more customers at lower margin so that the monthly sales target can be reached faster — then an appropriate discount should be automatically set.
Google Maps can charge some sort of static monthly fee for this feature, which can be used via UI (admin) or via API.
Created a web app. Used ES6 classes, including the use of private and public fields. Tested the app — all good.
Started to do multi-browser testing and got errors. FireFox was good enough to explicitly mention that class fields are not supported.
I find that if you declare the fields inside the constructor, IntelliSense will still pick them up. Having up-front field declarations, however, does make a class more readable and similar looking to C++ / Java / C#
Tried with FireFox 67.0.2, Edge 44.17763.1.0, and Chrome 75.0.3770.80
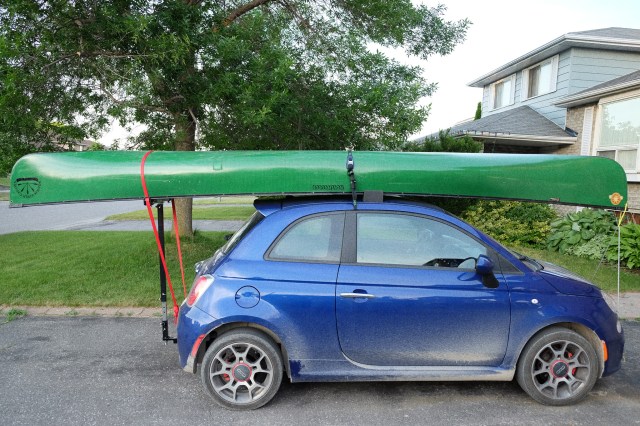
With a help of a hitch mount (about 2-hour DIY install) and a canoe loader from U-Haul one can throw a 17 foot canoe on a Fiat 500. No issues driving hours on a highway. The T-Bar prevents the trunk from opening, so you have to load the car first and mount the canoe as the last step.
Does it look comical? Yes. Is it functional — absolutely!
Bought the case for 120CAD with shipping from Kimplex Canada. The backrest was an additional 36 CAD. This is a great price for a case, especially one that’s made in Spain.
The Duke 690 is not a big bike, so I was looking for something that would not over power the bike. Style wise, the case matches the looks and the lines of the bike. The case is very lightweight and the mounting bracket does not look too large or too unsightly with the case off. I can fit 1 full size helmet plus gloves and a few other items.
Highly recommended!


I’ve been struggling with finding information regarding what’s needed to stream Netflix movies in 4K. My HTPC used to have an Nvidia Geforce GT 1030 card and it was NOT possible to play 4K movies due to video ram being less than the required 3GB. Otherwise the card had it all – HDMI 2.0 port, HDCP 2.2 support, and hardware HVEC decode capability.
I was pleasantly surprised that an Intel Core i3-8100 CPU with built-in UHD 630 iGPU can do Netflix 4k without a hitch.
Only caveat is that you will be limited to 30Hz refresh rate (due to HDMI 1.4 limitation) and HDR is not possible. Since HDR/SDR handling in Windows 10 is not all that great (yet), I will wait and use the iGPU for now.
For reference, I have
Also, with this setup I was able to go the furthest so far with Ultra HD Blu-ray Advisor from PowerDVD. I only have one thing missing which is HDR, otherwise all other requirements have been met!
First, it’s important to keep you Lambdas lean and mean as warm up times can be significant (in seconds!). Do not load unnecessary libraries like ASP.NET Core in your Lambda functions.
I’ll be showing how to use NLogTarget.Splunk package from NuGet (link).
Just like for any other type of app, you need an NLog.config file (see example here)
I strongly recommend you enable async logging in NLog.config via
targets async="true"
otherwise logging will be done synchronously, slowing down the execution time of your function.
To load NLog.config, do the following in the beginning of your function:
var logFactory = LogManager.LoadConfiguration("NLog.config");
var logger = logFactory.GetCurrentClassLogger();
// continue on using logger. LogManager.GetCurrentClassLogger() also works
NLog.config must be in your Lambda package, so ensure it’s copied there upon build (set it as “Content/Copy If Newer” in Visual Studio)
Prior to completing your Lambda’s execution, ensure you add
LogManager.Flush(new TimeSpan(0, 0, 3)); // flush any remaining messages. Max 3 seconds
This will allow NLog to “catch up” writing any outstanding log entries. If you have a global exception handler in your lambda function, make sure to add the same line there as well. If you do not — you may have a lambda that fails and no logs that are sent out.
That’s it. To learn more about using NLogTarget.Splunk, see documentation here
By default, there are several settings in IIS which would cause issues in Production for high-load applications.
(Steps below were tested on Win 2016, IIS 10, running ASP.NET Core 2.0.1 with .NET Framework 4.7.1)
Firstly, IIS is configured to shut down a process after x minutes of inactivity. The default setting is 20 minutes. The setting is called “Idle Time-Out (mintues)”.
In a web farm scenario, for one reason or another, you can have a node that did not receive a request in a span of 20 minutes. Once the node does receive the request, it will have to spin up the ASP.NET Core app, which takes some time. The user will then have to wait for the spin up to complete before receiving the response. This results in sub-ideal user experience.
To disable the timeout run this command:
(You can add these commands as .configs in your .ebextensions)
%systemroot%\system32\inetsrv\appcmd.exe set config -section:system.applicationHost/applicationPools /applicationPoolDefaults.processModel.idleTimeout:00:00:00 /commit:apphost
Also, IIS will recycle an app pool after very 29 hours (1740 minutes). To disable the auto-recycle, run this command:
%systemroot%\system32\inetsrv\appcmd.exe set config -section:system.applicationHost/applicationPools /applicationPoolDefaults.recycling.periodicRestart.time:00:00:00 /commit:apphost
Then, we need to set the start mode to “AlwaysRunning” instead of the default “OnDemand”
%systemroot%\system32\inetsrv\appcmd.exe set config -section:system.applicationHost/applicationPools /applicationPoolDefaults.autoStart:"True" /commit:apphost

%systemroot%\system32\inetsrv\appcmd.exe set config -section:system.applicationHost/applicationPools /applicationPoolDefaults.startMode:"AlwaysRunning" /commit:apphost
When deploying a new version of the app, IIS or ElasticBeanstalk will NOT automatically warm up or invoke your application. For this to happen you need to either automatically call each EC2 node and warm it up, or you can use IIS Application Initialization (https://docs.microsoft.com/en-us/iis/configuration/system.webserver/applicationinitialization/)
By default, EC2 nodes do not have this feature enabled. To enable the feature, install it via:
powershell.exe -Command "Install-WindowsFeature Web-AppInit"
Then, in you web.config, specify the path which should be called to warm up the application. In this example, warmup action is called on the Home controller.
<?xml version="1.0" encoding="utf-8"?>
<configuration>
   <system.webServer>
     <applicationInitialization>
       <add initializationPage="home/warmup" />
     </applicationInitialization>
   </system.webServer>
</configuration>
And here’s the controller/method:
public class HomeController : Controller
{
    [HttpGet]
    public async Task Warmup()
    {
        // do warmup
        // kick out requests not coming from 127.0.0.1 or ::1
    }
}
In the warmup method (action), I strongly recommend you check if the request is coming from ::1 or 127.0.0.1, and if it is not, disallow the warmup. This will prevent from someone doing a warmup (which is often expensive) without having the authorization to do so. Since the IIS Application Initialization module is doing the invocation of your warmup method, the request will come from 127.0.0.1
Lastly, you need to set “Preload Enabled” to “True” for all your sites via this command:
%systemroot%\system32\inetsrv\AppCmd.exe list app /xml | %windir%\system32\inetsrv\appcmd set app /in /preloadEnabled:True
And there you have it, your ASP.NET Core applications are now production ready!
When watching a hockey game it would be cool if you can see the game from the point of view of the players. If one could design a small camera that is of no trouble to the wearer and that has great image quality then during the game the broadcaster can cut to any of those cameras to show a different angle.
If watching online, I could select the player from a list below the video player widget and watch the game from that player’s point of view.
